This module was designed for transport control in the Adroit Custom system, but can also be used as a general-purpose transport mechanism.
It serves as a simple manager of play/stop/reset signals, a source of V/Bar timing signals for the Custom Scene Manager (and many modules in LSSP) and as a source of clock signals for conventional sequencers. It can also handle tempo synchronization using Voltage Modular’s 96 PPQN (pulses per quarter note) standard.
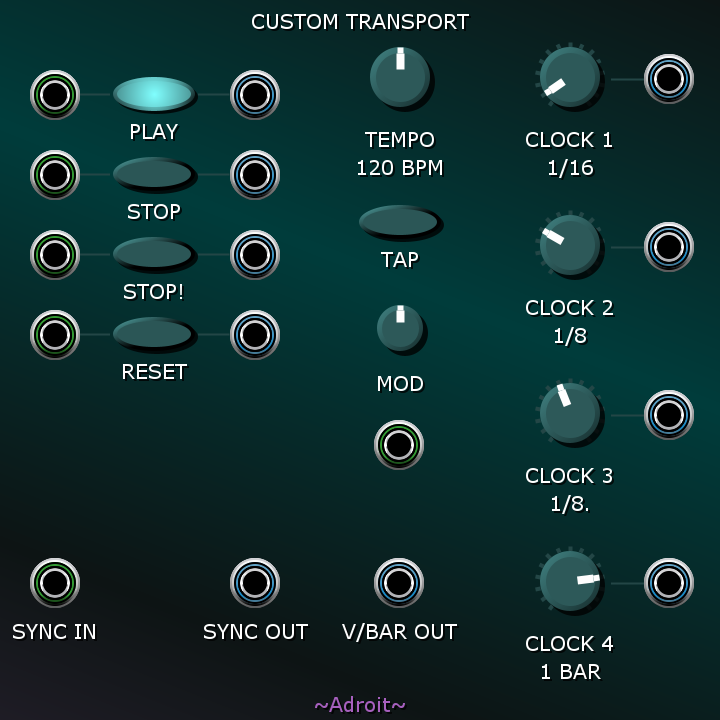
There is some functional overlap between this module and LSSP’s Song Control sequencer. Song Control is better for long form compositions while Custom Transport is more suited to dealing with short loops. In some circumstances you could use either or even both.
Four buttons provide basic transport control..
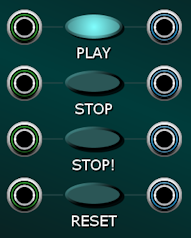
Pressing the PLAY button or sending a trigger signal to the socket on its left puts the transport in play mode.
Pressing the STOP button or sending a trigger signal to the socket on its left puts the transport in stopping mode. The button will flash until the current bar completes and then the transport will go into stopped mode.
Pressing the STOP! button or sending a trigger signal to the socket on its left puts the transport immediately into stopped mode.
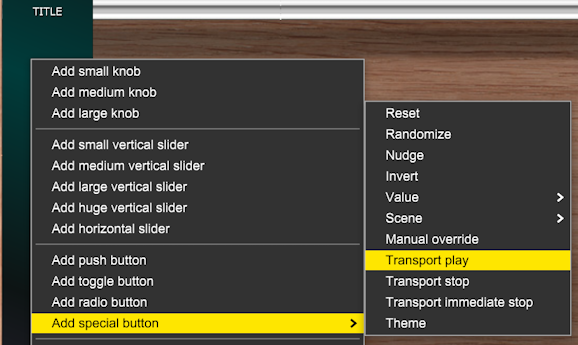
Buttons with these functions can be added to Custom Panel modules using their Add special button menu option.
Pressing the RESET button or sending a trigger signal to the socket on its left does not change the transport mode but does reset the internal timing. In effect it rewinds to the beginning of a sequence,
Custom Transport is essentially a V/Bar timer so it uses voltage as an analog for time rather than relying on periodic clock pulses. The V/BAR OUT socket is its primary output. Basically 1 V represents the beginning of bar one. 2 V represents the beginning of bar two and so on. Fractional voltages enable any intermediate point in time to be represented, so 2.5 V represents halfway through bar two.
This has many advantages but it may seem a bit strange if you are unfamiliar with LSSP. It’s a system that wouldn’t work in hardware as we can end up with quite high voltages but in the world of Voltage Modular voltages aren’t really voltages they are just high-precision numbers so we can express time directly and with sample-level precision rather than having to count pulses.
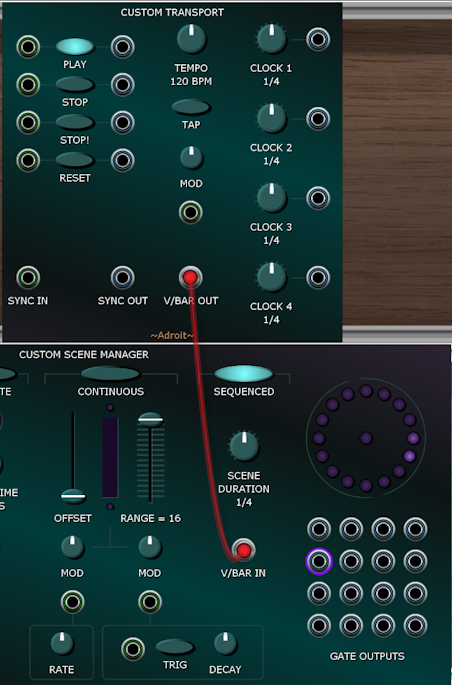
V/Bar simplifies things as there’s less wiring and no need to worry about propagation delays, race conditions or V/Bar sequencers getting out of sync and needing resetting. A voltage representing “now” is all that is required, as shown in the image below where a Custom Transport module is controlling the Custom Scene Manager with a single cable.
Because most sequencers don’t use V/Bar, Custom Transport provides various services to accommodate them.
To the right of the PLAY, STOP, STOP! and RESET buttons there are sockets that output triggers that you can use to control conventional sequencers and on the right-hand side of the module there are four clock outputs that convert V/Bar into regular clock signals.

The CLOCK knobs enable you to select one of 15 different clock rates for each output. When fully CCW the clock rate is 1/32 notes (i.e. 32 pulses per bar). When fully CW the clock rate is 8 bars (i.e. one pulse every 8 bars). A T is used to represent triplet timing and a . is used to represent dotted timing.
Should you have any difficulty selecting an exact clock rate you can get finer mouse control by holding down the CTRL (or ⌘) key.
Note that the clock outputs are gated. In other words they stop when the transport is in stopped mode.
The CV Watcher image below illustrates how the PLAY, STOP, STOP! trigger outputs and one of the CLOCK outputs relate to one another.
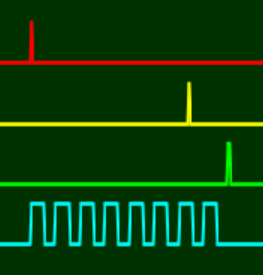
The red trace shows the trigger output by the socket on the right of the PLAY button when the PLAY button is pressed.
The yellow trace shows the trigger output by the socket on the right of the STOP button when the STOP button is pressed.
The green trace shows the trigger output by the socket on the right of the STOP! button when the bar comes to an end (note that in this situation the STOP! button hasn’t been pressed).
The cyan trace shows one of the CLOCK output signals. Notice that the rising edge of the first clock pulse occurs at the exact same time as the PLAY button is pressed and that there is a delay between the STOP button being pressed and the stream of clock pulses finishing because the STOP button was pressed part way through a bar.
Because the CLOCK was set to 1/8 notes we get a multiple of 8 clock pulses. In this instance because STOP was pressed before the end of the first bar we get exactly 8 clock pulses.
If we presssed the STOP! button instead of the STOP button then the clock pulses would stop instantly rather than continuing until the end of the bar. A side effect of this is that the internal timing would not be aligned on a bar boundary the next time the PLAY button is pressed. This can be fixed by pressing the RESET button.
In the discussion above we’ve been talking about “pressing” the buttons with a mouse click but the same logic applies if trigger signals are sent to the sockets to the left of the buttons.

If nothing is connected to the SYNC IN socket then the base tempo is controlled by the TEMPO knob. A TAP button is provided so that you can set the tempo more intuitively by clicking on the button several times.

Beneath the TAP button there is a MOD attenuverter knob and an input socket that lets you apply an offset modulation to the base tempo. When the attenuverter is fully CW or fully CCW a 1 V difference in the voltage sent to the socket will double or halve the tempo.
If a standard 96 PPQN sync signal is connected to the SYNC IN socket then Custom Transport’s internal V/Bar timer adjusts to match the external tempo and the TEMPO knob, TAP button and MOD input are ignored.
Whether anything is connected to the SYNC IN socket or not the SYNC OUT socket provides a 96 PPQN sync signal that is gated in the same way as the clock signals.
A Simple Demo
Click on the button below to download a .voltagepreset file. Then open the file.
More information on downloading presets
After a few seconds Voltage Modular should launch automatically with the patch shown below…
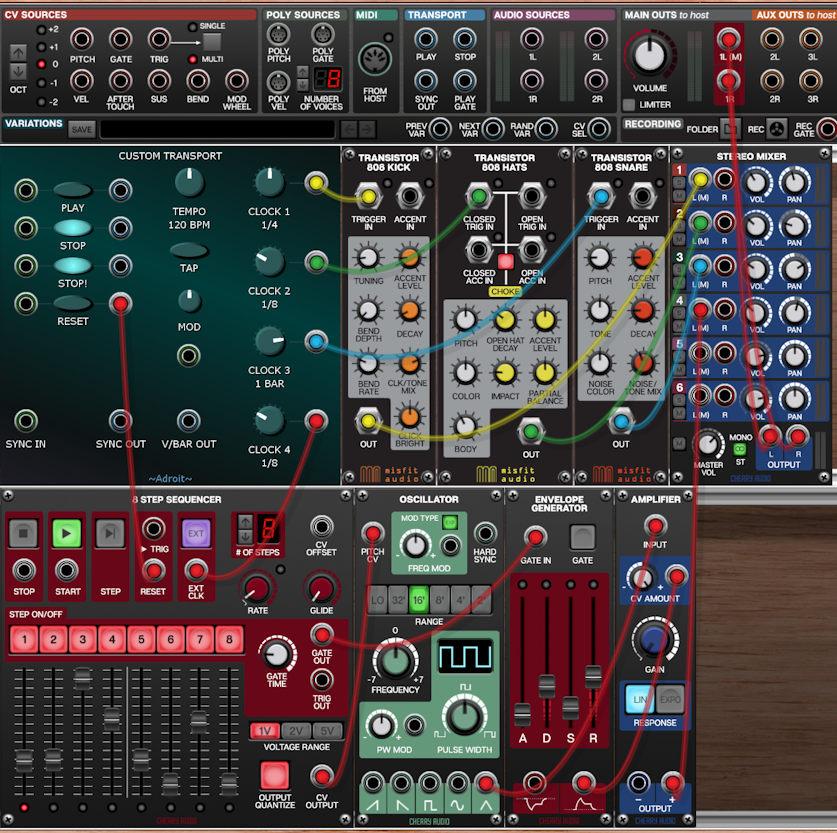
Click on the PLAY button and you should hear a simple loop play. After a while click on the STOP button and you should notice that the 8-Step Sequencer stops neatly on the last step.
It’s nothing fancy but this simple patch provides a little test bed for you to experiment with the controls. The patterns produced by the drum modules should be obvious but there’s some subtle complexity to transport control of sequencers and each sequencer seems to have its own little quirks.
Hopefully you’ll see that using the STOP button produces more musical results than the immediate stop caused by the STOP! button. You should also discover that if things get out of sync you can fix it by clicking on the RESET button.
Because Custom Transport uses V/Bar internally you should find that the four clock outputs don’t quite behave like a setup using four clock dividers. You can alter the clock rates and then put them back to their original settings and the original pattern is recreated. The timing is stable because all of the clocks derive from the same timing source and there aren’t any clock divider states to go astray. This “statelessness” means you won’t often need to resort to using the RESET button, apart from when the 8-Step Sequencer gets confused (as this does have its own internal state that can go astray).