This page describes a demo patch for Adroit Custom.
Duality is a polyphonic morphing synthesizer.
Information about downloading presets
The synthesizer has two scenes – one called A and another called B and you can morph between these using the mod wheel (or MIDI CC 1), a simple envelope generator, an LFO, a VLFO or by using aftertouch.
The green knobs are motorized and smoothly change settings depending on the current value of the morphing parameter. Other controls are not affected by morphing.
This patch is quite CPU intensive. If you experience crackling artifacts try reducing the NUMBER OF VOICES setting on the Voltage Modular I/O Panel. Somewhere around five voices should work on a mid-range machine.
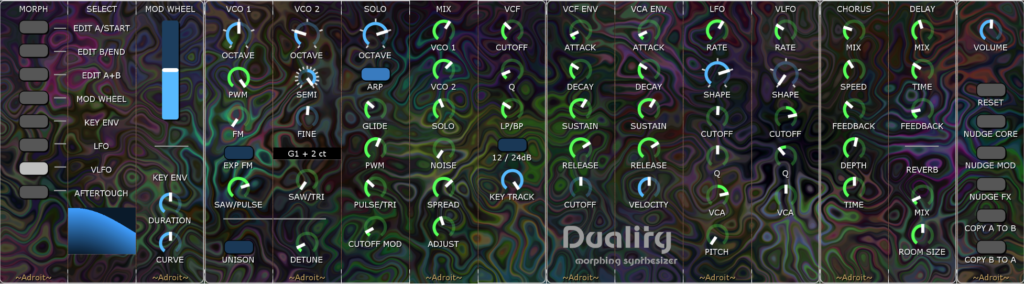
The interface is split horizontally into five sections called from left to right – Morph, Core, Mod, FX and Utility.
Table of Contents
Morph Section
This section consists of a column of radio buttons that allow you to select a morphing mode, a scope that shows a picture of how the morphing parameter is changing over time, a mod wheel slider (that is mapped to MIDI CC 1) and two knobs that control the behaviour of a simple envelope generator called the Key Envelope Generator.
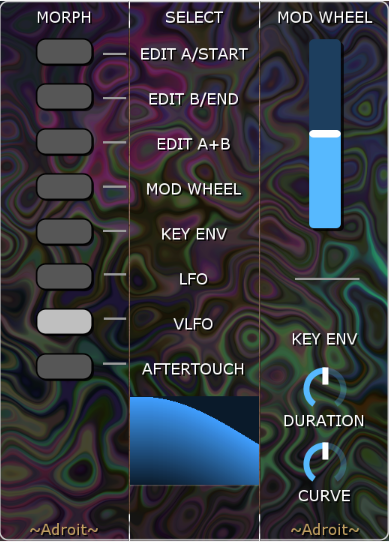
EDIT A / START when this button is selected the morphing parameter is fixed at Scene A and any changes to the green knobs only affect Scene A.
EDIT B / END when this button is selected the morphing parameter is fixed at Scene B and any changes to the green knobs only affect Scene B.
EDIT A + B when this button is selected the morphing parameter is set halfway between Scene A and Scene B and any changes to the green knobs affect both Scene A and Scene B.
MOD WHEEL when this button is selected the morphing parameter is set by the slider labelled MOD WHEEL. As this slider is mapped to MIDI CC 1 input then you can also adjust the morphing with either the physical mod wheel of a connected keyboard controller or via CC automation in a DAW.
KEY ENV when this button is selected the morphing parameter is controlled by a simple envelope generator that is triggered when a key is pressed. The morphing then transitions from Scene A to Scene B in the time set by the DURATION control.
To help you remember that Scene A is the start and Scene B is the end of the Key Envelope Generator’s cycle the editing button labels mentioned above include the words START and END.
Note that when playing legato the key envelope generator is not retriggered – in other words a cycle is only triggered on the transition from no keys being down to one or more keys being down.
The CURVE control allows you to bend the key envelope so that more change can occur earlier or later in the cycle. When the knob is at 12 o’clock the curve is linear, turning it CCW produces increasingly exponential curves while turning it CW produces increasingly logarithmic curves.
Sometimes you’ll want morphing that takes far longer than the range provided by the DURATION knob. Try using the MOD WHEEL or VLFO modes instead of KEY ENV.
LFO when this button is selected the morphing parameter is controlled by the low frequency oscillator.
VLFO when this button is selected the morphing parameter is controlled by the very low frequency oscillator.
AFTERTOUCH when this button is selected the morphing parameter is controlled by channel aftertouch. Polyphonic aftertouch isn’t supported.
Note that when the morphing mode is MOD WHEEL, KEY ENV, LFO, VLFO or AFTERTOUCH you can still change the settings of the green knobs. Whether Scene A, Scene B or both will be affected depends on the current value of the morphing parameter as a knob is turned. In many situations the morphing parameter will be somewhere between Scene A and Scene B so both scenes will be affected, although in KEY ENV mode if the envelope cycle has completed then changes will only affect Scene B.
When you want to be absolutely sure that you are only changing Scene A or Scene B it’s best to select EDIT SCENE A / START or EDIT SCENE B / END.
Core Section
This section consists of five sub panels that allow you to control the synthesizer’s two polyphonic voltage controlled oscillators, a monophonic voltage controlled oscillator, a mixer and a polyphonic voltage controlled filter.
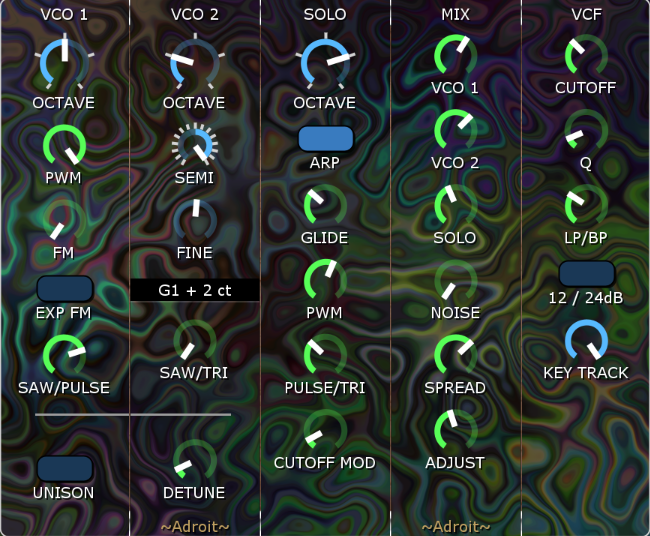
VCO 1
The column of controls beneath the VCO 1 label control a polyphonic voltage controlled oscillator with sawtooth and pulse wave outputs. The OCTAVE knob allows the base pitch to be varied over a five octave range.
The PWM knob controls the amount of pulse width modulation applied to the pulse output. It’s fed by a fixed rate LFO. When fully CCW the pulse output is a square wave.
The FM knob controls how much frequency modulation is applied to VCO 1 by a sinewave output from VCO 2. In other words VCO 1 is the carrier and VCO 2 is the modulator.
By default the FM is linear as this generally produces more musically useful results but if the EXP FM toggle button is engaged then exponential FM is used instead. This can be handy for more clangorous sounds.
The SAW / PULSE knob crossfades between the sawtooth and pulse wave outputs. The result is fed to the mixer.
VCO 2
The column of controls beneath the VCO 2 label control a second polyphonic voltage controlled oscillator with sawtooth and triangle wave outputs. The OCTAVE knob allows the base pitch to be varied over a five octave range.
The SEMI knob allows the pitch of VCO 2 to be offset by precise semitone amounts in the range +/- 7 semitones (a prefect fifth).
The FINE knob allows the pitch of VCO 2 to be further offset by a small amount to create detuning effects.
Beneath the FINE knob there’s a small pitch display that shows the base tuning of VCO 2. This can be useful when you want to set a precise interval between VCO 1 and VCO 2.
The SAW / TRI knob crossfades between the sawtooth and triangle wave outputs. The result is fed to the mixer.
SOLO
The column of controls beneath the SOLO label control a monophonic voltage controlled oscillator with pulse and triangle wave outputs. The OCTAVE knob once again allows the base pitch to be varied over a five octave range.
Being monophonic the SOLO VCO has limitations compared with VCO 1 and VCO 2 but these limitations can be exploited in interesting ways.
When the ARP toggle button is disengaged the SOLO VCO uses the pitch of the most recently pressed key. It takes a little practice to fully master but this can be used to in effect create crude melody or bass lines on top of harmonies provided by VCO 1 and VCO 2.
When the ARP toggle button is engaged then an automatic arpeggiator plays an up/down pattern at the same rate as the LFO. So VCO 1 and VCO 2 can provide static harmonies and the SOLO VCO can play an arpeggio on top. There’s no control other than the speed (set by the LFO’s rate ) but this feature can still be quite effective.
The GLIDE knob allows pitch changes to be slewed in order to produce portamento. When fully CCW there is no gliding. The glide function is applied after any arpeggio function.
The PWM knob controls the amount of pulse width modulation applied to the pulse output. It’s fed by a fixed rate LFO. When fully CCW the pulse output is a square wave. Note this LFO runs at a different rate to the one controlling PWM for VCO 1.
The PULSE / TRI knob crossfades between the pulse and triangle wave outputs. The result is fed to the mixer.
The CUTOFF MOD knob controls how much a sinewave output from the SOLO VCO modulates the cutoff frequency of the voltage controlled filter. Audio-rate cutoff modulation can produce a range of interesting effects that depend on the frequency ratio between the various oscillators. Note that cutoff modulation works even if the SOLO VCO’s own putput is muted (by setting the SOLO knob on the mixer fully CCW).
UNISON
In the bottom left corner of the Core Section there’s a UNISON button. When engaged VCO 1 and VCO 2 no longer play polyphonically, instead they play monophonically but with each voice slightly detuned to provide a rich and thick chorus effect. The number of voices depends on the NUMBER OF VOICES setting on the Voltage Modular I/O Panel.
The DETUNE knob enables you to control how detuned the voices are.
Note that VCO 1, VCO 2 and the SOLO VCO are all driven by the same pitch information from either a connected keyboard controller or a DAW.
MIX
The mixer provides separate knobs to control the level of VCO 1, VCO 2, SOLO and a white NOISE source.
A crude algorithm pans polyphonic voices depending on voice allocation. The SPREAD knob controls how wide the stereo image is (prior to any impact that the FX Section might have). When fully CCW all voices are positioned in the center.
The ADJUST knob is simply a volume control for the overall mix but because it morphs it can be used to set a different level for Scene A and Scene B. This makes it easier to adjust for differences in the perceived volume of the two scenes – as you will usually want both scenes to sound equally loud.
VCF
The column of controls beneath the VCF label control a polyphonic voltage controlled filter.
The CUTOFF knob controls the cutoff frequency of the filter. The knob setting is added to any modulation.
The Q knob controls the Q factor or resonance of the filter. The knob setting is added to any modulation.
The LP / BP knob crossfades between the low-pass and band-pass outputs of the filter.
The 12 / 24 dB toggle button allows you to select different filter slopes. Neither is best, they both have different characters.
The KEY TRACK knob controls how much impact a note’s pitch has on its filter’s cutoff. By default this knob is fully CW and the cutoff frequency moves up and down to track the pitch. This results in preceived brightness being independent of pitch. However, sometimes you want the filter to not track pitch – especially when making naturalistic bass sounds, so when the knob is fully CCW note pitch has no impact on cutoff frequency. Intermediate settings are useful too.
Generally KEY TRACK is something that you play with to fine tune how a sound changes across a wide pitch range once you’ve got the basic sound sorted.
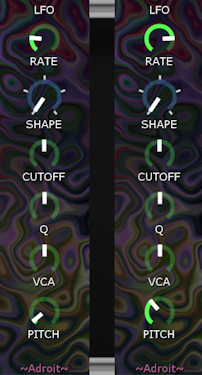
Mod Section
This section consists of four sub panels that allow you to control the synthesizer’s two polyphonic ADSR envelope generators, a low frequency oscillator and a very low frequency oscillator. Mod is short for modulation.
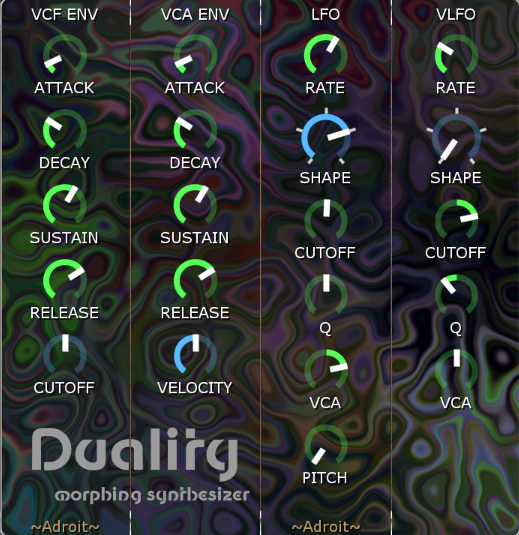
VCF ENV
The knobs beneath the VCF ENV label control a polyphonic ADSR envelope generator that is hardwired to control the cutoff frequency of the polyphonic voltage controlled filter.
The ATTACK, DECAY, SUSTAIN and RELEASE knobs behave as you would expect.
The CUTOFF knob controls the amount of modulation fed to the VCF. When set at 12 o’clock there is no modulation. CW settings produce positive modulation, CCW settings produce negative modulation.
Note that any modulation from this envelope generator combines with the VCF’s own CUTOFF knob setting and any other sources of modulation. So you will often need to adjust the VCF’s CUTOFF knob to shift things into range to get the effect you’re looking for.
VCA ENV
The knobs beneath the VCA ENV label control a polyphonic ADSR envelope generator that is hardwired to control the amplitude of a polyphonic voltage controlled amplifier.
The ATTACK, DECAY, SUSTAIN and RELEASE knobs behave as you would expect.
The VELOCITY knob allows you to control the impact that key down velocity has on each note’s amplitude. When fully CCW velocity has no impact. When fully CW velocity has considerable impact – to the extent that you may not be able to hear notes with very low velocity values. Intermediate settings might be useful to tame the volume variation when velocity values are highly variable.
LFO
The controls beneath the LFO label control a low frequency oscillator.
The RATE knob sets the LFO’s frequency in the range 0.08 Hz to 40 Hz. The slowest LFO cycle repeats once every 12.5 seconds.
The SHAPE knob selects between different waveforms – sine, square, rising ramp, falling ramp and random.
The PITCH knob controls the depth of pitch modulation of VCO 1, VCO 2 and the SOLO VCO by the LFO. It can used to create vibrato effects with a mid-range RATE setting and with SHAPE set to sinewave. If the PITCH knob is set fully CCW in Scene A and at some intermediate setting in Scene B and the morphing mode is KEY ENV then the vibrato will slowly fade in over a period set by the DURATION knob.
The LFO is reset when a DAW starts to help make modulation reproducible across multiple takes.
VLFO
The controls beneath the VLFO label control a very low frequency oscillator.
The RATE knob sets the VLFO’s frequency in the range 0.02 Hz to 10 Hz. The slowest VLFO cycle repeats once every 50 seconds.
The SHAPE knob selects between different waveforms – sine, square, rising ramp, falling ramp and random.
The VLFO is reset when a DAW starts to help make modulation reproducible across multiple takes.
FX Section
This section consists of controls for some simple built-in effects. A chorus, a delay and a reverb. FX is short for effects.
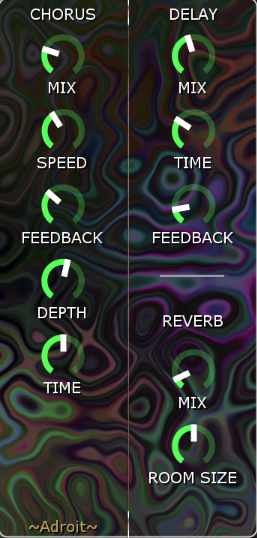
Chorus
The MIX knob controls the dry/wet mix of the chorus effect. Fully CCW is dry while fully CW is 1:1 mix.
The SPEED knob controls how fast the effect is modulated.
The FEEDBACK knob controls how much of the chorus output is fed back into the input.
The DEPTH knob controls the depth of the modulation.
The TIME knob controls how long a delay is used to achieve the chorus effect.
DELAY
The MIX knob controls the dry/wet mix of the delay effect. Fully CCW is dry while fully CW is 1:1 mix.
The TIME knob controls the length of the delay.
The FEEDBACK knob controls how much of the delay output is fed back into the input.
REVERB
The MIX knob controls the dry/wet mix of the reverb effect. Fully CCW is dry.
The ROOM SIZE knob controls the reverb’s decay length and character.
Utility Section
This section consists of a knob for controlling the overall volume of the synthesizer and a column of push buttons that allow you to perform some handy operations that affect the Core, Mod and FX section controls.
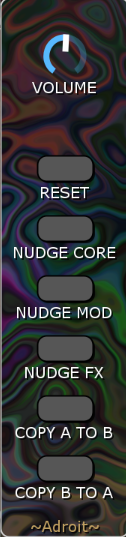
Unlike the mixer ADJUST knob, the VOLUME knob doesn’t morph, so you can use it control the overall output level of the synthesizer without having to worry about it interacting with the morphing parameter.
The RESET push button resets the controls of the Core, Mod and FX sections to their default settings. However it does this in the context of the current morphing mode and morphing parameter. So for instance it can be used to reset the controls just in Scene A, just in Scene B or in both scenes.
The NUDGE push buttons slightly randomize the settings of the controls in the relevant section. As with the RESET button this occurs in the context of the current morphing mode and morphing parameter.
The COPY A TO B push button copies the Scene A settings of the controls in the Core, Mod and FX sections to Scene B.
The COPY B TO A push button copies the Scene B settings of the controls in the Core, Mod and FX sections to Scene A.
The COPY buttons are useful when you’ve discovered a sound in either Scene A or Scene B that you particularly like and you want to use it as a starting point. After the copy operation both scenes will have the exact same settings and you can then work on varying the settings of one of the scenes to create a contrasting sound.
Slightly Unexpected Things
At first glance Duality seems to be quite similar to many other moderately complex subtractive synthesizers and most of the controls will look familiar. However, its morphing capabilities can result in a few behaviours that might initially seem confusing because morphing is in effect a hidden form of modulation.
Let’s look at the LFO RATE knob as a simple example. From the panel it appears that the rate of the LFO is controlled solely by the LFO RATE knob as there aren’t any other obvious controls that offer ways to modulate the LFO rate. However the RATE knob is motorized (as indicated by the green color-coding) so morphing can change its setting (providing that the RATE knob has different settings in Scene A and Scene B).
So if you select morphing mode EDIT SCENE A / START and adjust the LFO RATE knob to say 9 o’clock and then select EDIT SCENE B / END and adjust the LFO RATE knob to say 3 o’clock and then select the morphing mode VLFO, you’ll see that the VLFO output changes the position of the LFO RATE knob. In other words the VLFO can modulate the LFO rate even though there isn’t any explicit control visible in the interface.
Set the VLFO RATE knob to around 12 o’clock and the VLFO SHAPE knob fully CCW to generate a sinewave shaped morphing contour.
To hear the results of the VLFO modulating the LFO we need to modulate something with the LFO and here it becomes a little more confusing as the knobs controlling what the LFO modulates are also green colored and therefore motorized and their settings change too as the VLFO morphs between Scene A and Scene B!
Let’s say we want to make the LFO modulate the pitch of the VCOs to produce a vibrato effect. To do this we need to adjust the PITCH knob in the LFO column of controls. Now because the morphing parameter is moving between Scene A and Scene B then almost all of the time any adjustment of the PITCH knob will affect both Scene A and Scene B, but to be certain we could change the morphing mode to EDIT A + B, adjust the PITCH knob then switch the morphing mode back to VLFO.
Although it’s a bit complicated there are benefits – for instance let’s say we want not only the LFO rate to be modulated by the VLFO but the vibrato depth to be modulated too. So that when the vibrato is slow the depth is shallow but when the vibrato is fast the depth of pitch change is more pronounced.
We can achieve this change by selecting EDIT A / START and setting the LFO PITCH knob almost fully CCW and then select EDIT B / END and set the LFO PITCH knob to a higher setting. Then when we return to VLFO morphing mode not only does the LFO RATE knob move between 9 o’clock and 3 o’clock but the LFO PITCH knob moves too.
You may have already figured out that things can get even more confusing than described above because you could select LFO morphing mode. Then instead of the LFO rate and pitch modulation depth being modulated by the VLFO they’d be modulated by the LFO itself! This self-modulation is generally undesirable as the results can be chaotic but there’s no easy way to avoid the possibility and sometimes you’ll hit on a unique and useful outcome.
In general when the morphing mode is LFO you want to avoid the green LFO knobs having different values in Scene A and B. And when the morphing mode is VLFO you want to avoid the green VLFO knobs having different values in Scene A and B.
There are also situations where the envelope generators will behave in a chaotic fashion. For instance if an ATTACK setting is different in Scene A and Scene B and the morphing parameter changes during the attack phase then the attack contour will no longer behave as normal.
If say the morphing mode is VLFO and the synthesizer is playing a rapid series of notes then this might have a nice effect as the attacks slowly morph over time, but if the VLFO is running at high speed relative to the note sequence then the attacks will appear to bend instead. This may actually sound nice too but if you weren’t expecting this then it could be a little confusing.
If the morphing mode is KEY ENV then generally it doesn’t make much sense to have different envelope settings in Scene A and Scene B. Although sometimes it produces interesting effects.
Sound Design Tips
As mentioned earlier the morphing is in effect a hidden form of modulation with just one source (either the Mod Wheel, Key Envelope, LFO, VLFO or aftertouch) but a large number of destinations (the 45 green knobs). As the destinations can be used in parallel the number of permutations is astronomical. This is why the NUDGE functions are useful.
The NUDGE CORE, NUDGE MOD and NUDGE FX button functions aren’t intelligent so in practice you’ll often need to modify the results, but they are handy for discovering interesting possibilities.
One simple way to tame the setting of a knob that’s been changed to something a bit crazy is to double click on it to reset it to its default setting.
You can also quickly randomize the setting of an individual knob by holding down the ALT key (or Option key on a Mac) and clicking on it.
One way to design a sound is to select EDIT A / START and then click on the various NUDGE buttons until you accidentally find something interesting. Then refine the sound so that it works musically. Then use the COPY A TO B function to make Scene B the same as Scene A. You can then select EDIT B / END and either manually change settings or click on the NUDGE buttons one or two times so that the Scene B settings are related to Scene A but different enough that the contrast is interesting. Then experiment with different morphing modes to explore ways to morph between the two contrasting sounds.
A more methodical approach is to work through the green knobs one at a time and explore the ways that each different morphing mode effects their action. So focus on a single green knob, say VCO 1’s FM knob, and try out using the mod wheel, key envelope, LFO, VLFO and aftertouch modes.
A variant on this is to explore the morphing modes one at a time to see the effect on each green knob. For instance select KEY ENV then go through the various green knobs to see how the key envelope morphing mode affects their impact on the sound.
Obviously the two paragraphs above describe ways of explore the same “space”, they are just doing it in a different order. The thing is that the “space” is very large. Five morphing modes times 45 knobs is 225 different configurations and you’ll never have the patience to fully explore them all. Plus of course you aren’t limited to morphing only one knob at a time. So these ideas are just suggestions for ways to begin to explore.
Or you might have something specific already in mind….
For instance setting up a sound using KEY ENV morphing mode, with SOLO ARP switched on to create a high-pitched arpeggio on top of a large chord, with LFO SHAPE set to falling ramp with LFO VCA modulation turned up so that it sounds like there’s an envelope generator firing on each cycle of the LFO (and therefore each note in the arpeggio).
The start (Scene A) might use lots of FM to add harmonic richness, with the stereo SPREAD turned down low so that the sound is essentially mono.
Then by the end of the key envelope cycle (Scene B) the FM is reduced to zero, the LFO RATE slows down, LFO modulation of CUTOFF is added, some VCF Q modulation from the VLFO is added, the stereo SPREAD widens the stereo image and the REVERB fades up a little to create a sense of the sound moving away.