We have covered sufficient ground in previous tutorials to now build our first short “song”. It won’t be anything fancy and will be more of a sketch than a full blown composition but will demonstrate the essential mechanisms behind large scale sequencing in LSSP.
In this tutorial we’ll build the basic architecture and get a piano playing the chord progressions. In the next we’ll add simple melody, pad, bass and drum patterns.
Allow twice as much time for this tutorial as the previous ones as it covers more ground. But it’s key to understanding LSSP and it’s best to do it in one long session. Everything is covered step by step so you shouldn’t have any problems so please don’t feel intimidated by the size of this tutorial.
Table of Contents
Structure
Making it up as you go along can be fun but sometimes it’s sensible to have an outline of what you want to achieve. Here the plan is to build a song with the following structure:
Intro – Verse – Chorus – Verse – Chorus – Bridge – Chorus – Outro
The Intro will have four bars, while the Verse, Chorus, Bridge and Outro will all be eight bars in length.
Begin a new Voltage Modular patch and add a Song Control module and eight Song Part modules (as the song has eight parts) to form the Song Control Sequencer.
Use the LINK OUT and LINK IN sockets to link the modules together as we’ve done before, then click on the area that says Part Name Here on each of the Song Part modules and type in a label for each part – Intro, Verse 1, Chorus 1, Verse 2, Chorus 2, Bridge, Chorus 3, Outro.
Then use the down arrow button on the first Song Part module to set its NUMBER OF BARS to four as the Intro is four bars long rather than the default eight.
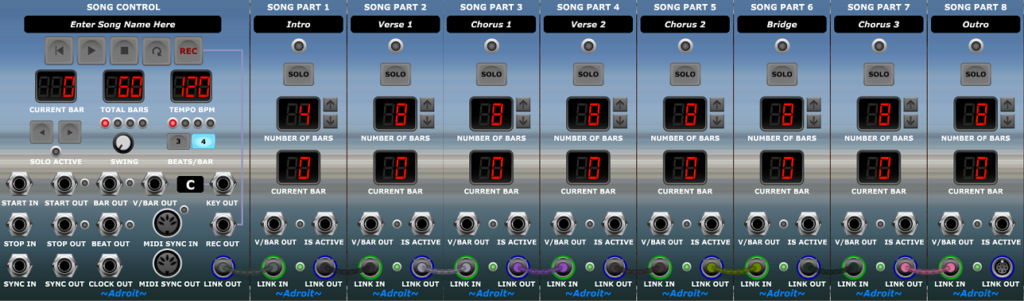
Note that each of the Song Part modules has a little green light indicating that everything is wired up properly. Also the TOTAL BARS indicator on Song Control is 60 which is the correct number of bars in the song. So at a constant tempo of 120 BPM and 4 beats per bar, the song will last exactly two minutes. A short song but perfect for our needs.
Click on Song Control’s LOOP and PLAY buttons and you should see the Song Parts activate one after another with CURRENT BAR readouts counting accurately.
Try clicking on one of the Song Parts’ SOLO buttons. This makes the Song Control Sequencer instantly jump to the selected part and that part then plays in isolation. This is great for concentrating on one part of a song while making modifications.
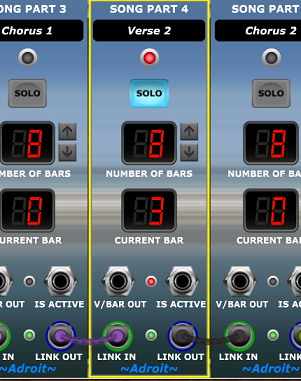
Click on an active SOLO button to cancel the solo and return to the normal play order.
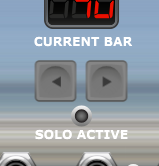
Also try the FAST FORWARD and REWIND buttons to quickly move forwards and backwards one bar at a time. These buttons auto-repeat so you can quickly skip to where you want to be when editing.
These are the chord progressions we’ll be using (at one chord per bar rate to keep things dead simple for now)…
Intro :
| V | V | V | V |
Verse:
| IV | ii | V | V |
| IV | IV | I | ii |
Chorus:
| I | V | vi | iii |
| IV | V | I | ii |
Bridge:
| ii | iii | IV | V |
| ii | iii | IV | vi |
Outro:
| V | ii | V | ii |
| V | I | I | I |
We aren’t looking to come up with innovative chord progressions here, we are just trying to understand how LSSP can be used to create a song. So you would have heard these chord progressions countless times before. Indeed the whole song is deliberately rather clichéd.
Sections
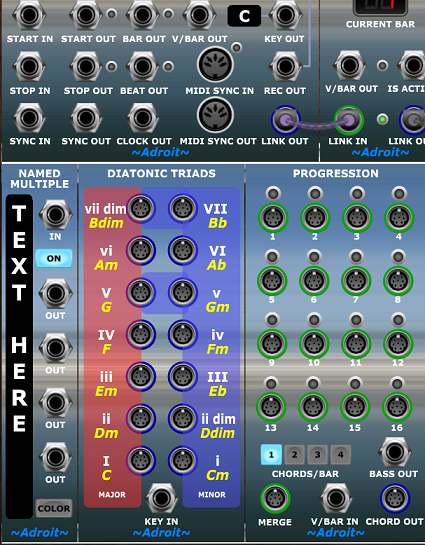
We are dealing with our first fairly large scale patch and it will be rather tall, so to help in navigation let’s introduce the Named Multiple module. This is one of those simple utility modules that isn’t particularly exciting but is incredibly useful. Its main role is to label the modules next to it and turn what initially looks very complicated into something with obvious structure.
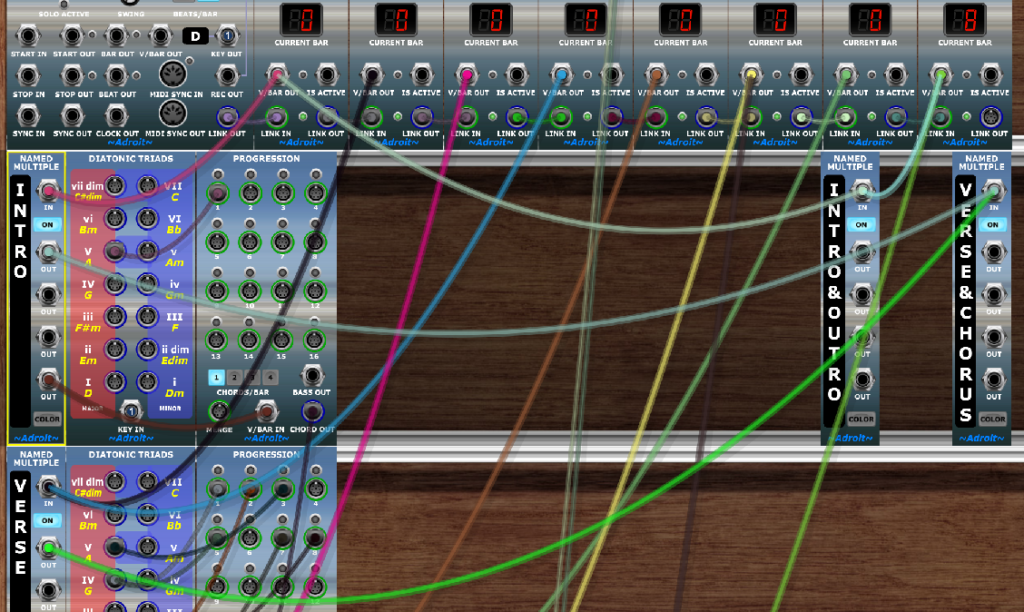
So add a Named Multiple module in a new cabinet beneath the Song Control module. Then add a Diatonic Triads module and a Progression module on the right.
We will need this little trio of modules for the Intro, Verse, Chorus, Bridge and Outro – so five sets in all. Note we only really need one Diatonic Triads module but it’s far neater and easier to see what’s happening if each section has its own copy.
Before proceeding let’s interrupt things very briefly to introduce LSSP’s default key setting feature. So far we’ve been working in C, but let’s patch the Song Control module’s KEY OUT socket to the Diatonic Triads’ KEY IN socket to easily open the possibility of working in other keys.
As we are going to be making five copies of the Diatonic Triads module we can use the Bus facility to save on cabling. So right-click on Song Control’s KEY OUT socket and assign it to Bus 1 then right-click on Diatonic Triads’ KEY IN socket and assign it to Bus 1.
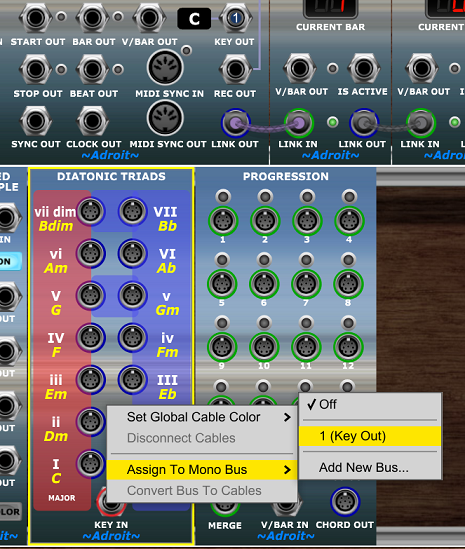
Click on the control displaying C just to the left of the Song Control KEY OUT socket to access a menu of keys. Select D instead of C. It’s surprising what difference a few semitones can make.
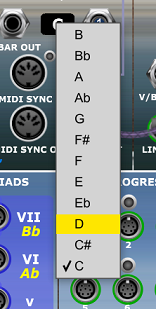
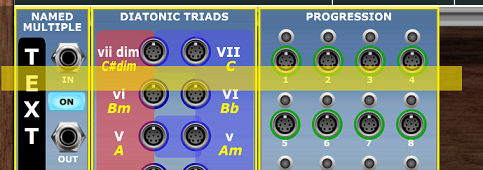
Notice that the chord names (displayed in yellow) on the Diatonic Triads module have changed to reflect the new key while the Roman Numerals remain fixed.

OK, key changing diversion over, let’s create copies of our trio of modules.
Select all three modules (Named Multiple, Diatonic Triads and Progression) by dragging the mouse over them.
Alternatively, build the selection by CTRL clicking.
Now to duplicate all three modules hold down the ALT key and drag the modules via one of their titles to the very bottom of the cabinet.
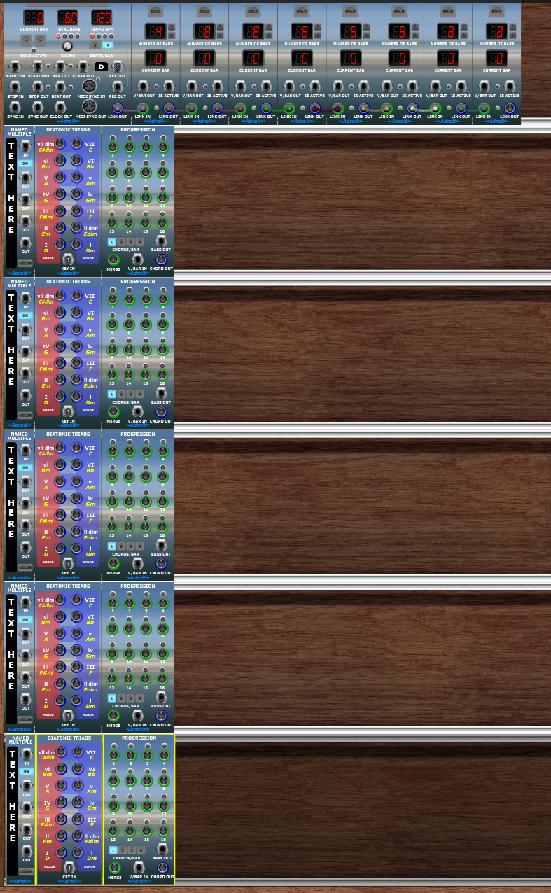
Do this four times in total. So if you zoom out you should see five sets of the modules beneath the Song Control Sequencer.
Now label each of the cabinets by double clicking on the TEXT HERE section of each Named Multiple module and typing in the names of the sections. From top to bottom – INTRO, VERSE, CHORUS, BRIDGE, OUTRO. Don’t worry about case as the Named Multiple converts everything to upper case.
Next wire up the initial V/Bar signals. If you leave the Song Control Sequencer running in a loop while doing this you can see the various LEDs light up to show the sequencing working.
We can use the multiple facility of the Named Multiple modules to neatly distribute the V/Bar signals in order to make things a little more ordered. In more complex patches this really helps as multiple V/Bar signals within a section are wired to the Named Multiple rather than directly to the Song Part modules. This greatly simplifies things.
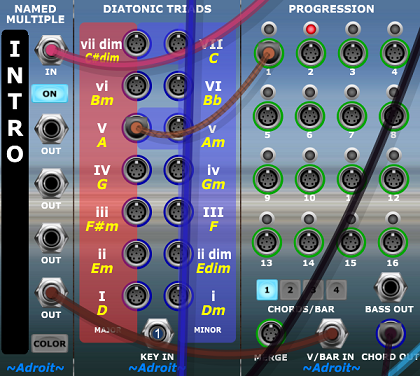
First the Intro. Patch the V/BAR OUT socket of the Song Part module labelled Intro to the IN socket of the Named Multiple labelled INTRO. Patch the bottom OUT socket from that module to the V/BAR IN socket of the Progression module to its right.
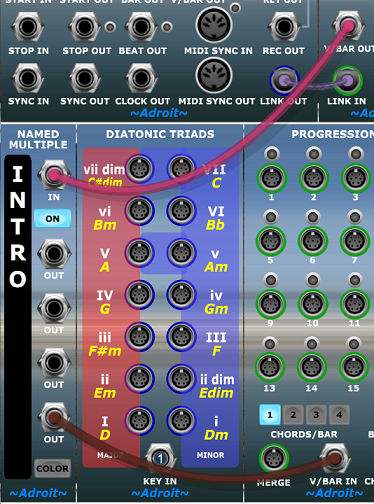
Now when the Intro Song Part is active you will see the Progression module’s LEDs 1 through 4 light up in turn.
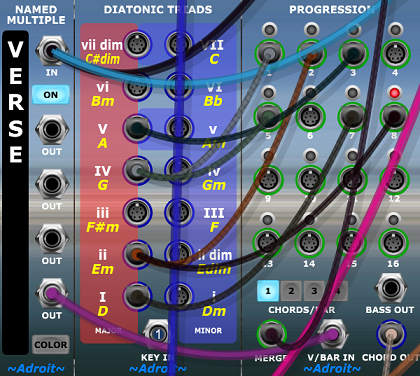
Next the Verses. The Verse plays twice so we need to patch two cables. One from the V/BAR OUT of the Song Part labelled Verse 1 and another from the Song Part labelled Verse 2. Both these cables feed to the IN socket of the Named Multiple labelled VERSE.

As with the Intro, patch the bottom OUT socket from the Named Multiple module to the V/BAR IN socket of the Progression module to its right.
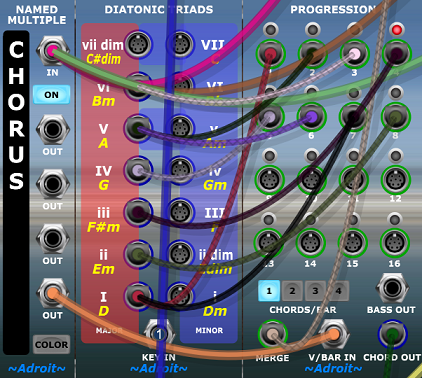
Next the Choruses. The Chorus plays three times so we need to patch three cables. One from the V/BAR OUT of the Song Part labelled Chorus 1, another for Chorus 2 and finally one for Chorus 3. All of these cables feed to the IN socket of the Named Multiple labelled CHORUS. Then patch the bottom OUT socket from that module to the V/BAR IN socket of the Progression module to its right.
Then the Bridge. Patch the V/BAR OUT socket of the Song Part module labelled Bridge to the IN socket of the Named Multiple labelled BRIDGE. Patch the bottom OUT socket from that module to the V/BAR IN socket of the Progression module to its right.
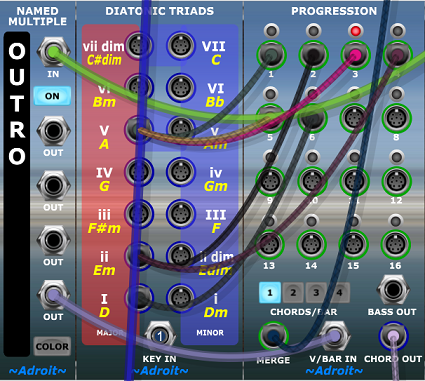
Finally the Outro. Patch the V/BAR OUT socket of the Song Part module labelled Outro to the IN socket of the Named Multiple labelled OUTRO. Patch the bottom OUT socket from that module to the V/BAR IN socket of the Progression module to its right.

Hopefully, this all seems quite logical and you can see the various LEDs lighting up in the correct order.
At this point it’s perhaps sensible to save your work as a preset called Tutorial 7.
The next big job is programming the chord progressions but rather than do that “in the dark” let’s build a simple piano instrument so that we can hear what we are doing and also create some framework that will help in the next tutorial where we will be adding more instrumental parts.
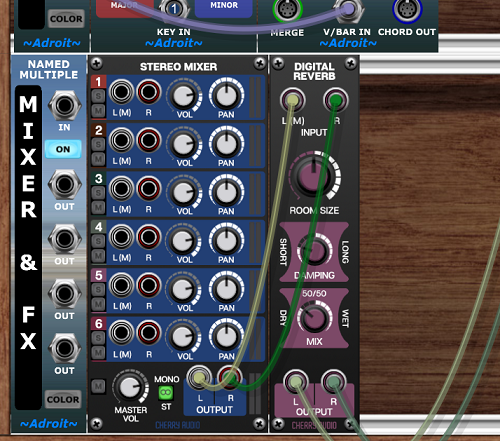
At the very bottom of our patch add another Named Multiple module in a new cabinet. Double click on TEXT HERE and type in MIXER & FX.
Add a Six Input Stereo Mixer module to the right of the Named multiple, then a Digital Reverb module.
Patch the L and R outputs of the Mixer to the inputs of the Reverb and then the L and R outputs of the Reverb to the 1L (M) and 1R MAIN OUTS at top of the Voltage Modular window.
At this point you may be questioning how tall and narrow this patch is going to get, especially given the advice about aspect ratios in an earlier tutorial. The answer is quite a bit taller! And although we are going to add some more modules that take up horizontal space, this is a demonstration patch. In a practical patch some cabinets might contain many more modules and the aspect ratio would not be quite so unbalanced.
However LSSP patches can be quite tall as it’s easier to navigate up and down to find the section you want. The Named Multiple comes into its own here in helping you find the cabinet you are after. Also a mouse wheel is very handy for easy vertical scrolling.
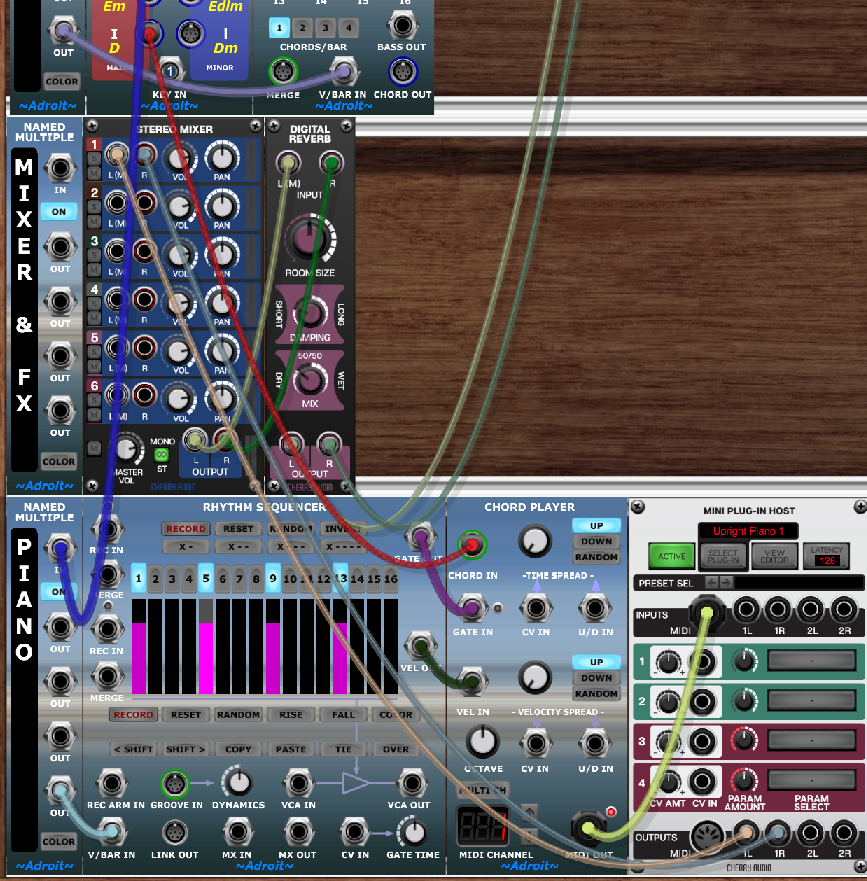
Begin yet another new cabinet beneath the Mixer adding a Named Multiple, a Rhythm Sequencer, a Chord Player and a Mini Plug-In Host.
Set the Named Multiple label to PIANO. Patch the bottom OUT socket from the Named Multiple to the V/BAR IN socket of the Rhythm Sequencer. Then patch the GATE OUT and VEL OUT of the Rhythm Sequencer to the GATE IN and VEL IN of the Chord Player. Then the MIDI OUT of the Chord Player to the MIDI IN of the Mini Plug-In Host module.
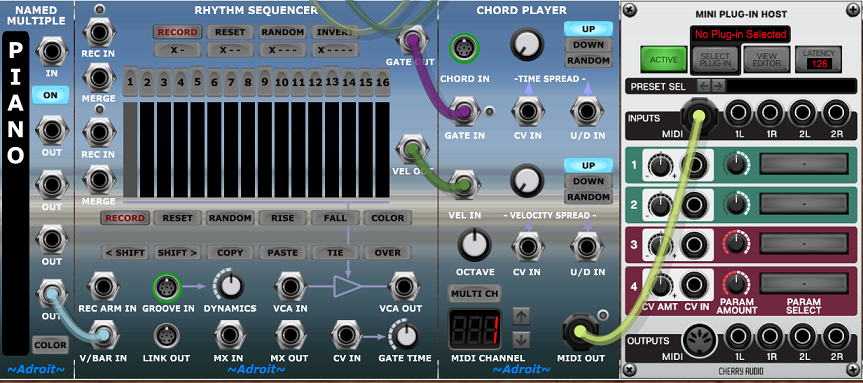
Then patch the 1L and 1R outputs of the Mini Plug-In Host to the 1L (M) and 1R inputs of the Mixer module in the cabinet above.
Load your favorite VST piano plug-in or any polyphonic VST instrument with a piano like patch by clicking on the Mini Plug-In Host’s SELECT PLUG-IN button.
For the purpose of testing, patch the Song Control module’s V/BAR OUT socket to the V/BAR IN socket of the Named Multiple labelled PIANO. And patch the I output from the nearest Diatonic Triads module (in the OUTRO cabinet) to the CHORD IN socket of the Chord Player.
Click on the Rhythm Sequencer’s X – – – button to program a simple 1/4 note pattern.
Providing that PLAY and LOOP on Song Control are still engaged you should now hear a D major chord playing once per beat. Shift it up an octave by adjusting the Chord Player’s OCTAVE knob.

Progressions
We now need to wire up the Progression modules so that all their outputs are merged. Disconnect the test cable from the CHORD IN socket of the Chord Player. As there is now no chord signal there should be silence.
Beginning with the top-most Progression module (in the cabinet labelled INTRO) patch the CHORD OUT socket to the MERGE input socket of the Progression module below (in the cabinet labelled VERSE).
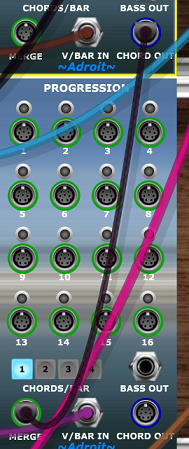
Do the same thing for the Progression modules below so that each CHORD OUT is connected to the MERGE socket of the Progression module below. This passes the chord signals down the chain so that the final output in the OUTRO cabinet consists of all the Progression sequencer modules’ outputs combined.
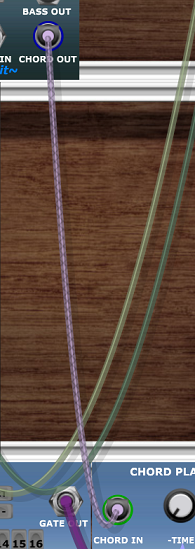
To complete the circuit, patch the CHORD OUT of the Progression module in the OUTRO cabinet to the CHORD IN socket of the Chord Player in the PIANO cabinet.
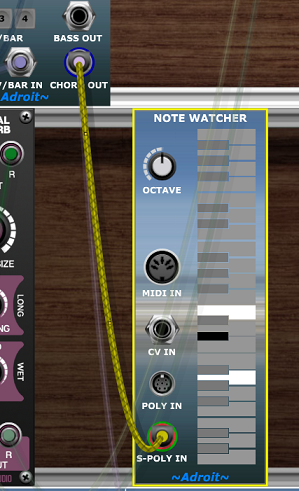
By the way, when using the full version of LSSP one would normally have a Note Watcher module attached to the final CHORD OUT socket in the chain of Progression modules so that the notes of the current chord are displayed on its keyboard.
Right, so let’s program the chord progressions. Do this while the Song Control Sequencer is running (with PLAY and LOOP engaged)
A quick note on cable colors: In the example patching below the cable colors are just being randomly selected by Voltage Modular. It’s pretty easy to modify the colors if you want to by using the right-click menu on a socket. So for instance you could make all V chord cables green. I would like to have an automated mechanism for managing this and hope to persuade Cherry Audio to make a small modification to their development environment in a future update to accommodate this.
First the Intro. Press the SOLO button on the Song Part module labelled Intro.
The chord progression couldn’t be simpler as it’s just the V chord repeated over four bars.
| V | V | V | V |
So in the cabinet labelled INTRO just patch the V socket from the Diatonic Triads module to the 1 socket of the Progressions module. This will result in an A chord being played every beat.
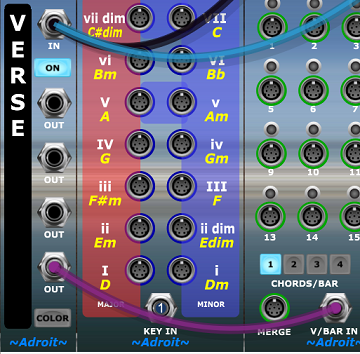
Next the Verse. Press the SOLO button on the Song Part module labelled Verse 1.
| IV | ii | V | V |
| IV | IV | I | ii |
In the cabinet labelled VERSE patch the IV socket from the Diatonic Triads module to the 1 socket of the Progressions module.
Then ii to 2.
Then V to 3.
Then IV to 5.
Then I to 7.
Then ii to 8.
Next the Chorus. Press the SOLO button on the Song Part module labelled Chorus 1.
| I | V | vi | iii |
| IV | V | I | ii |
In the cabinet labelled CHORUS patch the I socket from the Diatonic Triads module to the 1 socket of the Progressions module.
Then V to 2.
Then vi to 3.
Then iii to 4.
Then IV to 5.
Then V to 6.
Then I to 7.
Then ii to 8.
Next the Bridge. Press the SOLO button on the Song Part module labelled Bridge.
| ii | iii | IV | V |
| ii | iii | IV | vi |
In the cabinet labelled BRIDGE patch the ii socket from the Diatonic Triads module to the 1 socket of the Progressions module.
Then iii to 2.
Then IV to 3.
Then V to 4.
Then ii to 5.
Then iii to 6.
Then IV to 7.
Then vi to 8.

Finally the Outro. Press the SOLO button on the Song Part module labelled Outro.
| V | ii | V | ii |
| V | I | I | I |
In the cabinet labelled OUTRO patch the V socket from the Diatonic Triads module to the 1 socket of the Progressions module.
Then ii to 2.
Then V to 3.
Then ii to 4.
Then V to 5.
Then I to 6.
That’s all the chord progressions done so now click on the SOLO button on the Song Part module labelled Outro to disengage the soloing and return to normal song part ordering.
You should now hear the entire song’s chord progressions being played. But it’s extremely dull as this is the absolute minimum skeleton of a song with nothing but the simplest triads being played once per beat.
Refinement
We will be adding much more interest in the next tutorial but before we finish this one let’s just add a little bit of movement to the piano part.
I realise that this has already been a long tutorial but get yourself a coffee and let’s have one last push so that you are left with something a little more inspiring than the current boring state of play.
Save the patch again as Tutorial 7 just in case something goes wrong.
Let’s begin by simply adding more rhythmical interest.
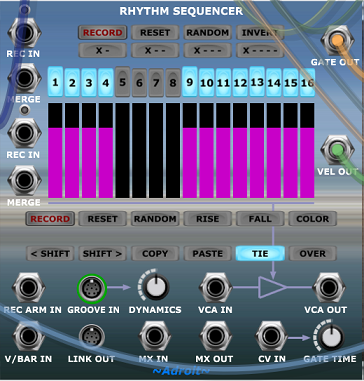
Replace the boring 1/4 note rhythm by clicking on the numbered buttons of the Rhythm Sequencer in the cabinet labelled PIANO to program the pattern shown below.

Also, very importantly, engage the TIE button as this enables sustained notes to be achieved. Otherwise you’ll end up with repeated 1/16th notes, which might be what you want in other circumstances but here we are trying to build a chordal accompaniment that isn’t too busy. We don’t want it to distract from other elements that we will be adding later.
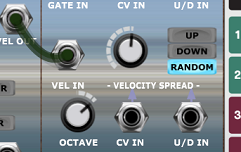
Then to make the note velocities vary a little rather than always being the same let’s introduce a little random velocity spread on the Chord Player next door.
Engage the lower RANDOM button and turn up the VELOCITY SPREAD knob to about half way.
You should now have something far more musically satisfying than before. But it’s still exactly the same rhythm all the way through the song.
So let’s have two different chordal rhythms. The current one playing in choruses and verses and a slower one for the intro, bridge and outro.
In V/Bar based sequencing there are two basic notions. Time-splitting and time-combining. This sounds more complicated than it is.
The Song Part modules and time-splitting modules such as Time Split 2 split V/Bar signals. And in this tutorial we have already used time-combining by combine Verse 1 and Verse 2 signals to feed the VERSE cabinet and by combining Chorus 1, Chorus 2 and Chorus 3 to feed the CHORUS cabinet.
Let’s do it again by combining the Intro and Outro V/Bar signals into one signal and the Verse and Chorus V/Bar signals into another.
Rather than create another cabinet let’s use some of the space in the cabinet labelled INTRO. Add two Named Multiple modules on the right side of this cabinet, away from the existing modules to avoid confusion. Label them INTRO&OUTRO and VERSE&CHORUS.
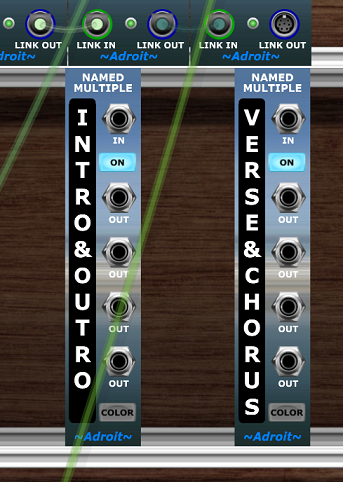
Patch the V/BAR OUT socket of the Song Part labelled Intro to the IN socket of the Named Multiple labelled INTRO&OUTRO. Then patch the V/BAR OUT of the Song Part labelled Outro to the IN socket of the Named Multiple labelled INTRO&OUTRO.
Do the same kind of thing for the input of the Named Multiple labelled VERSE&CHORUS. But rather than go to the trouble of combining all five outputs from the Song Parts we can just use the two already combined signals available via the outputs of the Named Multiples labelled VERSE and CHORUS.
Hopefully, you can see how incredibly logical and simple this is (through the maze of wiring).
Now we have a good range of different V/Bar signals at our disposal for feeding to sequencers…
Intro, Verse 1, Chorus 1, Verse 2, Chorus 2, Bridge, Chorus 3, Outro, VERSE, CHORUS, INTRO&OUTRO and VERSE&CHORUS.
Each of these signals can of course be fed to time-splitter modules to divide things still further so that we can easily derive a V/Bar signal that is only active in the second bar of the Choruses for example. There are almost endless ways of combining and splitting V/Bar signals just as there are almost endless ways of reusing motifs in a composition.
But all we are trying to achieve at the moment is two different chordal rhythms.
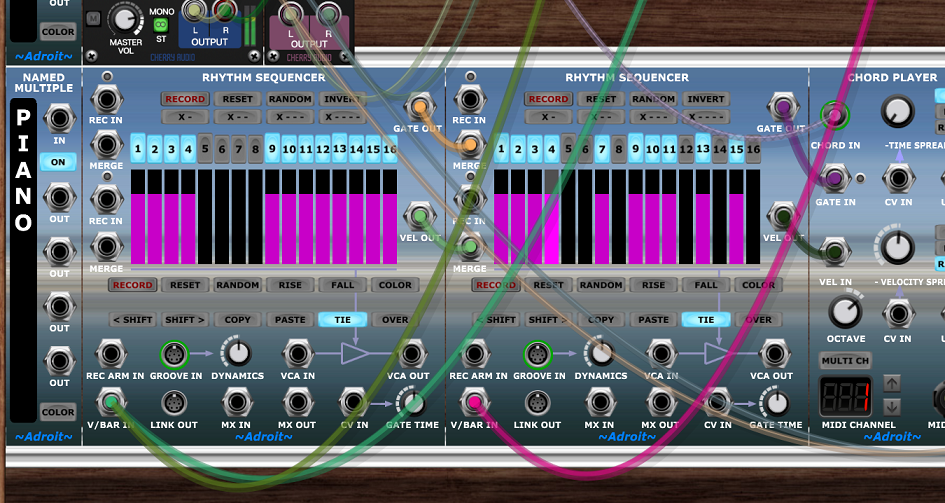
In the cabinet labelled PIANO add another Rhythm Sequencer inserted between the Named Multiple and the existing Rhythm Sequencer. And patch its GATE OUT to the upper MERGE socket of the Rhythm Sequencer on its right. Then patch the VEL OUT to the lower MERGE socket as shown below.
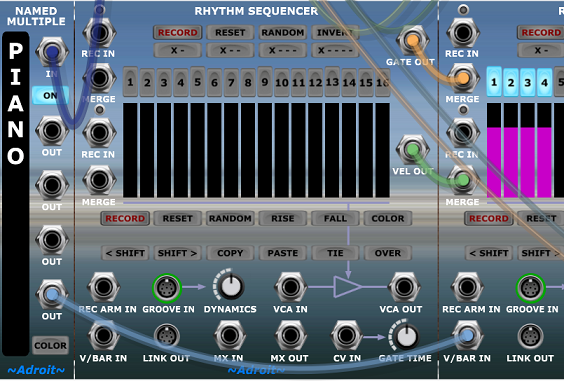
We want a slower rhythm for this sequencer pattern to provide contrast so click on the TIE button to enable long sustained notes then use the numbered buttons to program the following pattern of a 1/4 note, a rest and a 1/2 note.
Note it’s very tedious doing this at the moment. Rhythm Sequencer needs further development work and an improved editing mechanism for setting multiple buttons with a simple swipe of the mouse is planned. At the moment the fastest way of programming this pattern is to use the INVERT button to switch all steps on, then click on the four buttons (5 through 8) to switch them off.
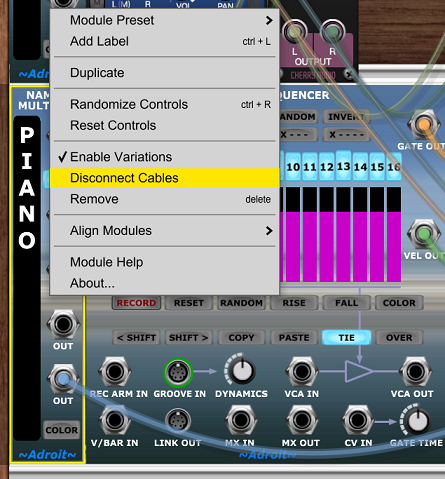
This new rhythm has no effect at the moment because of the lack of V/Bar sequencing. To fix this first disconnect the old V/BAR IN wiring feeding the right-hand Rhythm Sequencer. The quickest way to do this is to use the right-click menu on the Named Multiple and select Disconnect Cables.
This will silence the patch as there is now no V/Bar signal at all feeding either of the piano’s sequencers.
So let’s resurrect the sequencer on the right by patching its V/BAR IN socket to one of the outputs from the Named Multiple labelled VERSE&CHORUS.
Next bring the sequencer on the left into play by patching its V/BAR IN socket to one of the outputs from the Named Multiple labelled INTRO&OUTRO.
We are almost there but when the Bridge is playing the piano falls silent. This is because we only have V/Bar signals when either the Intro, Outro or a Verse or Chorus is playing. To fix this all we need to do is patch a cable from the V/BAR OUT of the Song Part labelled Bridge to the V/BAR IN socket of the left-hand piano sequencer.
You should now have the very bare bones of a simple song playing with a little bit of human feeling and some minor rhythmical contrast between sections.
It’s important to realise that, while sonically all we have at the moment is a single track of a piano playing basic triads, what your hard work has actually achieved is an architectural framework complete with all the harmonic foundations necessary to build a complete multi-instrumental song with great efficiency as will be demonstrated in the next tutorial.
Hopefully this tutorial has enabled you to grasp the underlying logic and processes involved and you can see how you might adapt these techniques to create your own songs.
Save the patch as it stands as a preset called Tutorial 7 because we will be coming back to it in the next tutorial to add a melody, pad, bass and drums.