This module performs several tasks but it’s called “Chord Memory” because its main job is to store and output an S-Poly signal that can be used to represent either chords or scales. When a patch is saved and reloaded the stored signal persists. Its purpose is to allow you to easily create customized chords and scales.
Chords or scales can be recorded using an external MIDI keyboard or via the CHORD IN socket or they can be manually entered with mouse clicks on the built-in keyboard.
Chords or scales using up to 15 notes can be stored.
The built-in keyboard also enables recorded chords or scales to be edited (when the RECORD button is disengaged).
The AUTO IN and AUTO OUT sockets allow multiple Chord Memory modules to be chained together to form an easy to use polyphonic step recorder. You can capture a chord progression simply by clicking on the first RECORD button and playing the chords in succession on your MIDI keyboard.
This doesn’t mean that the chain of Chord Memory modules acts as a polyphonic sequencer it just makes it easy to record a series of chords. Use a Progression or 8 to 1 Poly Switch module to do the actual chord sequencing.
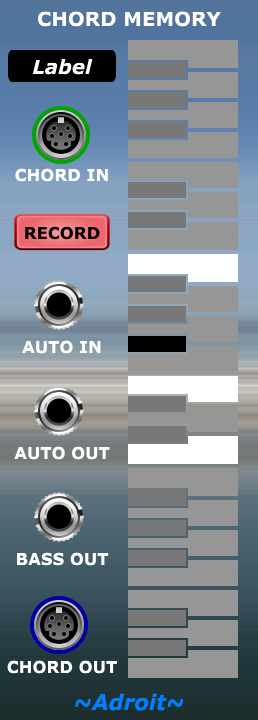
At the top left there’s an editable text label that you can use to help identify what the module is storing.
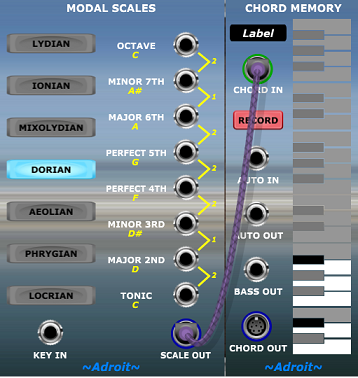
Typically the CHORD OUT signal will be patched to a Progression module, 8 to 1 Poly Switch or used as pitch quantization input for a Melody Sequencer, Pitch Adjuster, N-Step sequencer or Granular Synth.
In addition to the CHORD OUT signal a standard 1 V/Octave BASS OUT signal is provided that tracks the pitch of the lowest note in the chord or scale.
The Chord Memory module’s exact behaviour varies depending on how it is connected and whether the RECORD button is engaged.
Table of Contents
Standalone Mode
When the RECORD button is disengaged the module is controlled by left mouse clicks on the built-in keyboard. In its default condition no keys are selected, the CHORD OUT S-Poly signal is a zero note chord/scale and the BASS OUT signal is zero volts (which corresponds to C2 in Voltage Modular).
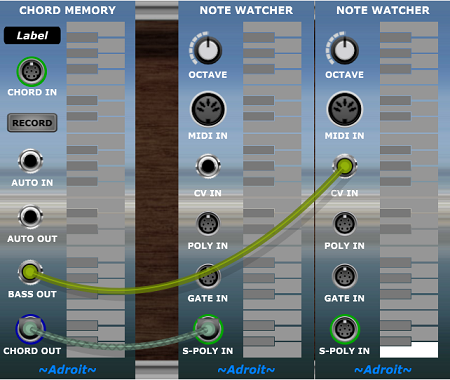
In the images below a couple of Note Watcher modules are used to show exactly what the output signals are doing, although it’s all pretty obvious.
A left mouse click on one of the keys toggles its state from off to on (or on to off). Up to 15 keys can be on at the same time. (S-Poly connections are limited to 15 note polyphony as there are 16 “wires” and the first is used to indicate how many notes are active).
Unless you have a steady hand it might be best to zoom in when editing using the built-in keyboard.
If you have a mouse-wheel then there are some handy shortcuts to help with zoom – CTRL wheel up/down on a PC (⌘ wheel up/down on a Mac) will zoom in and out. Shift wheel up/down will scroll horizontally. Wheel up/down with no modifier key will scroll vertically.
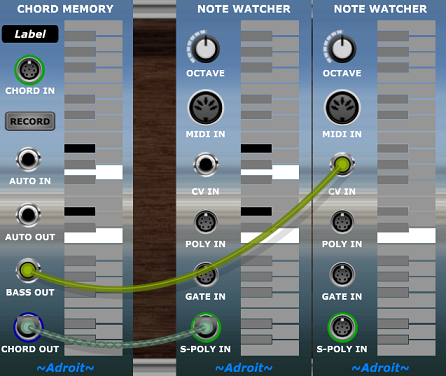
As you can see in the image above the Note Watcher connected to the CHORD OUT socket exactly mirrors the Chord Memory module’s state while the Note Watcher connected to the BASS OUT socket shows that it’s outputting a control voltage representing the pitch of the lowest note that is on.
Except when the AUTO IN socket is connected, pressing the RECORD button erases the current note pattern ready for the recording of a new chord or scale. So a quick way to clear all notes is to double click on RECORD. If you accidentally hit the RECORD button while editing it’s easy to quickly recover with a CTRL Z or ⌘ Z. or a click on the undo button at the top of the Voltage Modular window.
Monophonic mode
When the CHORD OUT socket is not connected and the BASS OUT socket is connected and RECORD is disengaged then clicks on the built-in keyboard behave slightly differently. The module assumes that it’s being used as a monophonic pitch CV source so only allows one note at a time to be on.
Recording from an external keyboard
If you engage the RECORD button while nothing is connected to the CHORD IN socket then the module automatically takes its input from whatever is feeding Voltage Modular’s I/O Panel‘s POLY SOURCES. This will generally be any MIDI keyboard you have plugged into your computer but could be recorded MIDI data from your DAW.
This is the easiest way to program chords into the Chord Memory module. Simply click on RECORD and play the chord you want to store.
If you don’t have a proper MIDI keyboard you can scrape by with the virtual one provided by Voltage Modular and enter chords using your computer’s keyboard. However, as with the Melody Sequencer, a MIDI keyboard is highly recommended even if you have no real keyboard skills.
Recording begins when the first key is pressed and continues until no keys are pressed, so even if your keyboard skills are terrible you can take your time and easily enter complex chords. For instance you can hold down the key for the root note with one finger and then use another finger to enter the other notes one by one. When you are finished release all keys and the chord will have been recorded.
This technique is especially useful when recording scales as it can be very difficult to form your hands into the correct shape otherwise (and you might run out of fingers).
If you make a mistake simply release all the keys and start again. The old notes will be erased by your first new key press.
When you are happy click on the RECORD button to disengage record and return to the standalone mode. If required you can then modify the chord or scale using mouse clicks as described earlier.
Note that editing via the built-in keyboard is only possible when the RECORD button is disengaged.
When entering huge chords or scales by pressing down all the keys at once, be aware that Voltage Modular’s NUMBER OF VOICES setting needs to be set sufficiently high to cope.
The Chord Memory module only handles notes in the range C2 to B4 but you can still enter notes from other octaves. Notes below C2 will have their octave raised to fit in range and notes about B4 will have their octave lowered to fit in range.
Step recording from an external keyboard
Having discovered how easy it is to capture a single chord let’s look at a neat feature provided by the AUTO IN and AUTO OUT sockets.

This feature enables any number of Chord Memory modules to be chained together by connecting the AUTO OUT of one to the AUTO IN socket of the next to form a polyphonic step recorder.
Now if we want to record multiple chords to build a chord progression then rather than having to manually hit all the RECORD buttons in the correct order to manually turn recording on then off, then on then off and so on, it all happens automatically.
Just click on the RECORD button of the first Chord Memory module and play the chords you want to record (leaving a gap between each one). Each module automatically drops out of record mode after recording a chord and then activates recording in the next module by sending a trigger via its AUTO OUT socket to the AUTO IN socket of the next module in the chain.
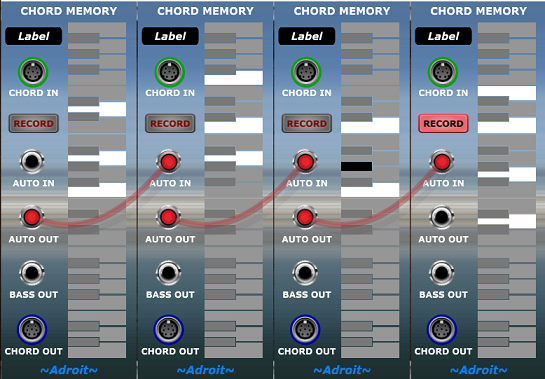
When finished the RECORD button of the last active module will still be engaged, Click on this button to complete the operation.
If you want the final Chord Memory to automatically drop out of record mode then you could patch its AUTO OUT to some “spare” input socket that has no effect other than to be a sink for the final trigger. However a more elegant solution is to connect the AUTO OUT socket of the final module in the chain back to the AUTO IN socket of the first module to create a ring of modules that can record in a loop over and over.
Now each time you play a chord it replaces the current module’s chord and recording automatically shifts to the next module, looping back to the beginning after recording to the last module in the chain.
This can work well in a performance situation where you have say a two chord vamp going on while you twiddle with other aspects of the patch. Then when it’s time for a change just play a couple of different chords on the keyboard and you have a new vamp set up. With a little practice you can do this seamlessly.
Recording from the S-Poly input
You may want to modify an existing chord or scale S-Poly signal. This can be achieved easily by plugging it into the Chord Memory’s CHORD IN socket and double clicking on the RECORD button to capture the signal and drop back into Standalone Mode so that you can then perform edits using mouse clicks.
The display updates live when in record mode so you can also use a Chord Memory module as a cut-down version of Note Watcher to inspect what an S-Poly signal is carrying.
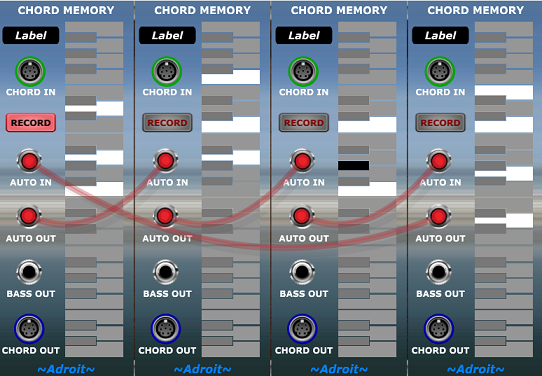
Demo patch
Here’s a slightly cheesy patch that might be useful for exploring the Chord Memory module.
This is set up to do automated looped step recording of four chords from a MIDI keyboard but you can easily remove the cables linking AUTO OUT to AUTO IN to give you four independent units.
Skinning Shortcut
The Chord and Chord Memory modules are bundled with the Adroit Granular Synth yet by default look quite different. But you can simply right click on the ~Adroit~ logo at the bottom of these modules. They will then switch backgrounds. You only need to do this once as they will remember the setting. Another right click on the logo will return them to normal behaviour.

Availability
The Chord Memory module is available in LSSP XL, the Granular Synth bundle and the N-Step bundle.