Adroit modules are designed with large scale patches in mind so care has been taken to ensure that they operate efficiently. The sequencers use almost no CPU when their V/Bar input signal is zero volts (in other words when they are dormant). The time splitters are also very efficient.
So it should be possible to build patches containing large numbers of Adroit sequencers without placing too much stress on your CPU – assuming that most sequencers are arranged in chains rather than all running simultaneously.
As an example, if say a Time Split 8 module is distributing V/Bar signals amongst a chain of eight sequencers then the CPU load still shouldn’t be much more than when only a single sequencer is running.
However, that stills leaves all the other modules in a patch. Things like oscillators, filters and plug-in hosts can put a strain on your CPU even when they aren’t contributing anything to the sound.
It’s probable that you’ve been using Voltage Modular settings that work just fine with small patches but one of the aims of LSSP is to help you create huge patches, so it’s important to tune the settings to really get the maximum performance out of your computer otherwise you may be frustrated by crackling noises and even complete drop outs.
Table of Contents
Settings in Voltage Modular
Cherry Audio’s documentation on Settings is here.
Even though most of you will already be familiar with the Settings, the following assumes you know nothing about them.
To access the Settings in Voltage Modular click on the little cog icon in the Toolbar right at the top of the window.

This opens a dialog box with a menu at the top.

The important menu options for tuning performance are CPU and Audio/MIDI.
General points
Before discussing the individual options it’s important to understand what we are trying to achieve here – which is to get large scale patches to run without any nasty audio artifacts occurring. This is not necessarily about getting the average CPU load figure as low as possible. So when looking at CPU load using performance measurement tools remember that what really matters is how things sound.
So rather than focusing purely on getting the headline CPU load figure as low as possible you should instead be running a demanding test patch such as LSSP 101 Tutorial 5 and be tuning the settings so that everything works without any audio glitching.
Although generally low CPU load is a good thing and can lead to good audio performance, this is not always the case. It’s far better to have a patch running smoothly with a 30% load than it is having a patch clicking and stuttering with a 20% load.
Also remember that average load figures do not accurately reflect peak load. It’s peak loads that cause the problems.
Another thing to note is that settings interact with each other and that there are no hard and fast rules because a lot depends on your exact situation – what spec computer you have, what peripherals and drivers you are using and several other factors. So it’s not easy to find the sweet spot.
Interactions with other software running alongside Voltage Modular can be unpredictable. With luck you should be able to do things like browse the internet without any real impact but if your system is struggling then shutdown as many unnecessary processes as you can.
When you first switch on your computer or first run Voltage Modular a ridiculously large number of tasks might be automatically scheduled. It can take as much as five or ten minutes before things settle down. If you are working on a critical project then allow ten minutes of messing around with Voltage Modular before recording anything. You’ll often get glitches during this “settling in” period that disappear once everything has calmed down.
Although many people don’t use battery power, if you do this can have a big impact on performance. Check out your computer’s battery management controls. If your battery is very low then it will be impossible to run demanding audio software as your laptop will do everything it can to prevent it having to do an emergency shutdown.
Yet another thing to think about is the ambient temperature. If you are running a computer in a hot room in the middle of summer then you will get far worse performance than in a chilly room. Also note that if you are using a laptop and recharging a flat battery this can create a lot of heat and this will have an impact on performance. Usually the best thing to do when you have a flat battery is to turn the laptop off and take a break while it recharges to at least 50%.
CPU settings
Whether you enable the “Use Multiple Threads For Mixing” option depends on your CPU and how many cores it has. If you have a very old machine with a CPU that has just one or two cores then much of this discussion is irrelevant as you won’t be able to run even basic patches anyway.
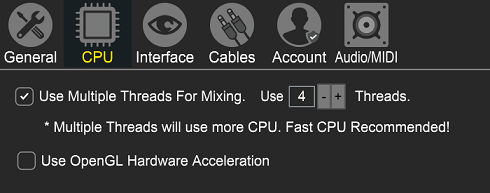
But for a relatively modern machine try enabling it. What you will see is a large jump in the CPU load. This makes many people think this must obviously be a bad thing and they immediately turn it off, but as explained above, it’s far better to have a high load that works than a low one that doesn’t.
In theory the more cores your CPU has the higher you should set the number of threads used but I find that 4 works OK on my 8 core CPU. But it’s worth experimenting with different settings – always remembering that it’s not the CPU load that matters but whether or not your test patch glitches.
The “Use OpenGL Hardware Acceleration” option seems to sound like a good idea. But in most cases you will find that it’s best left unchecked. Graphics acceleration has moved on a long way and OpenGL is generally best avoided. On some machines enabling this option will destroy performance. However, give it a try.
In fact Cherry Audio have recently dropped support for OpenGL saying it was more trouble that it was worth.
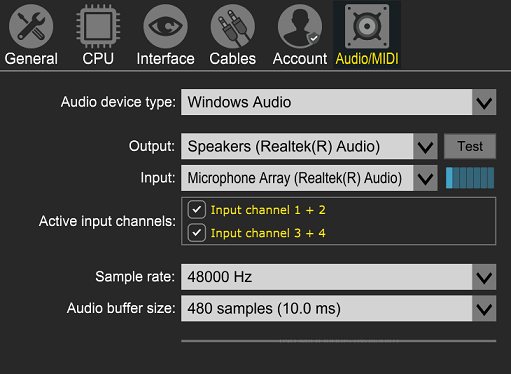
Audio/MIDI settings
The MIDI settings only show up when a MIDI device is connected and aren’t a concern here. The main setting you need to be exploring is the “Audio buffer size”.
The buffer size is important in two respects – bulk processing efficiency and latency.
The buffer size determines how many samples are processed in a batch. The larger the batch size the more efficient the process is. But the larger the buffer is the longer it takes for audio to be produced – this is called latency.
In many situations latency is not a major concern so you can use a large buffer size in return for efficiency gains.
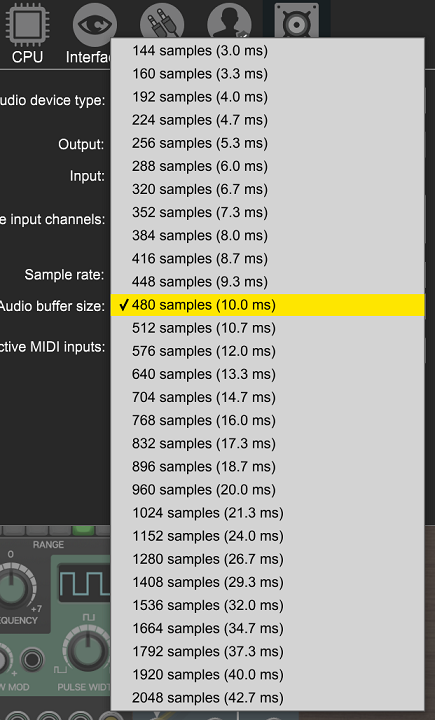
However, if you are playing a keyboard in a live situation then latency becomes an issue.
One way to look at this is by translating latency into distances. Sound usually travels at about 343 metres per second so a latency of 10 milliseconds is the same as a sound source being 3.43 metres from the listener. This is roughly the distance between band members on a small stage and is fine. However, a latency of 40 milliseconds is like being 13.72 metres away and things start to become problematic.
For readers more familiar with feet – 3.43 metres is just over 11 feet, 13.72 metres is about 45 feet.
One of the reasons why conductors of orchestras use a baton is that the latency from one side of an orchestra to the other is sufficiently large that musicians hear a temporal smear. Getting the attack right requires ignoring the fact that what a musician is hearing from colleagues might be delayed by 20 or 30 milliseconds.
The “Sample Rate” setting should be left at 48000 Hz unless you have a really good reason to do otherwise. Changing it from this value introduces overheads and degradation in sound quality caused by re-sampling.
The image at the top of this Audio/MIDI settings section shows what you might find on a typical PC. However if you have an external audio interface then you will have more options.
Years ago there was a massive difference between built-in audio facilities and more professional external equipment. Today this margin has shrunk somewhat but you will still get better quality audio from a decent external audio interface. There will be small differences in efficiency but the more important benefits of external hardware will likely be in terms of improved signal-to-noise ratio, lower distortion and more balanced frequency response. Also many external interfaces feature high quality microphone pre-amps.
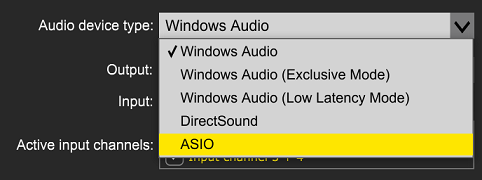
With an external audio interface you will get more options for the “Audio device type” which enables you to choose different drivers. Again this used to be an important distinction with ASIO being considered far superior to native drivers but these days I’m not so sure it matters much unless you are using a very sophisticated multi-channel interface. As before the best approach is to experiment with a demanding test patch and see what results you get.
Plug-in Host Settings
The Plug-in Host and Mini Plug-in Host modules have their own audio buffers. The buffer size can be changed by clicking on their LATENCY button.
Note that the little numerical readout inside the button is the buffer size in samples so the actual latency is this number divided by the sample rate.
This setting can be critical when running Voltage Modular as a plug-in inside Voltage Modular because although the settings for the top-level patch might be optimal you could be getting nasty audio glitches because the Plug-in Hosts can’t compute their buffer load of data quickly enough to keep up.
The default Plug-in Host buffer size is just 128 samples so you may well need to increase it.
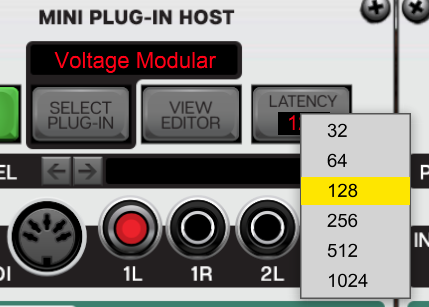
For some reason there are far less options than in the main Voltage Modular settings but there’s still a good range available. If you are having problems then first try increasing the setting to 512 as that still gives you a reasonably latency figure of 10.7 milliseconds.
If you are using multiple copies of a Plug-In Host in a patch (as in LSSP 101 Tutorial 5) then make sure to set each one to the same LATENCY to avoid any timing discrepancies.
When building your own patches that embed Voltage Modular inside of Voltage Modular try comparing the various versions of the Voltage Modular plug-in. You may for instance find that the VST3 version works best on one platform but not on another.