This first tutorial introduces the following Adroit Synthesis modules…
However the real focus is on having some fun getting to know the CV Sequencer.
Table of Contents
Getting started
You will need (as a minimum) the free Nucleus version of Voltage Modular and the demo version of LSSP 101 already installed on your computer.
You can then download this tutorial’s .voltagepreset file by clicking on the button below. It’s a tiny file so should only take a second or two to download. When you open the downloaded file it should automatically load Voltage Modular with the tutorial patch ready built for you.
More information on downloading presets
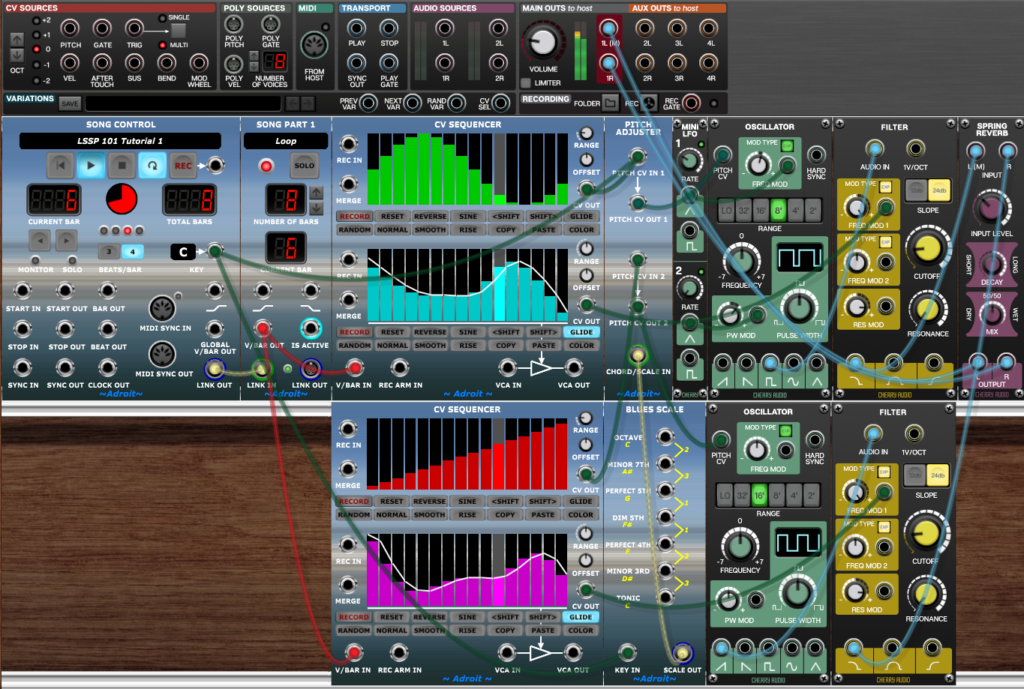
So after just a few clicks you should see something like the following on your screen…
Tempo isn’t saved as part of a Voltage Modular patch so check that the tempo at the very top of the Voltage Modular window is set to 120 BPM.

In the top left of the patch you’ll find a Song Control module. Click on its PLAY button.

You should now hear a one bar loop playing and see various display elements animating.
An overview of the patch
It can be difficult to see the wood for the trees when looking at a patch on screen for the first time. There’s too much detail and the cables might as well be spaghetti. So these tutorials include block diagrams that provide a simplified view of what’s going on.
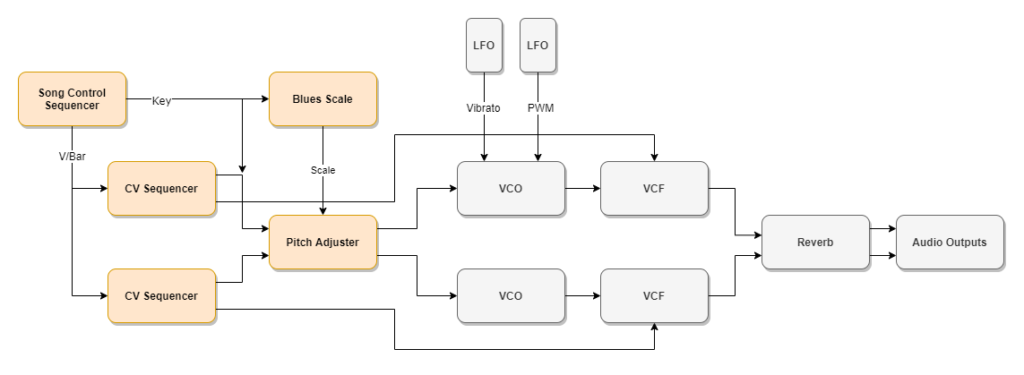
By convention signals flow roughly left to right and top to bottom and both the actual patches and the block diagrams try to keep to this, but sometimes real life isn’t quite so simple.
The patch consists of two very simple monophonic synthesizer voices. You can hear one in the left stereo channel, the other in the right. Initially the right-hand voice is set to be an octave lower than the other but you can of course alter anything you like.
Each voice is controlled by a CV Sequencer that features two channels. In this patch the upper channel controls pitch while the lower one controls the cut-off frequency of a filter.
The Song Control and Song Part modules work in tandem to create something called the Song Control Sequencer. It’s rather over the top for a simple patch like this but comes into its own in larger scale projects. In this tutorial all it’s doing is providing a timing signal (using something called V/Bar) that drives the CV Sequencers and a simple pitch offset voltage that allows keys other than the default C to be used.
The outputs from the CV Sequencer are intended for general purpose CV modulation use rather than for controlling pitch (the Melody Sequencer is specifically designed for this task, but is only available as part of LSSP XL) however the CV Sequencer outputs can be quantized to fit a particular scale or chord using the Pitch Adjuster module.
Pitch Adjuster includes two quantizers so both voices can be processed by just the one module. In this patch the Pitch Adjuster is being fed with an S-Poly scale signal from the Blues Scale module. So all pitches are shifted to the closest note in the blues scale.
This first patch only produces a single repeating bar made up of 16 steps with practically no control over rhythm so it isn’t particularly musically interesting but we need to start somewhere. Later tutorials will feature far more sophisticated patches.
Exploring the CV Sequencer controls
Perhaps the best place to start exploring the potential of this patch and the functionality of the CV Sequencer module is to try clicking on the various buttons at the bottom of each of the four sequencing channels.
These channels are color-coded (click on the COLOR buttons to change the colors).
Green – the pitch sequence for the voice coming out of the left stereo channel.
Cyan – the filter cut-off sequence for this voice.
Red – the pitch sequence for the voice coming out of the right stereo channel.
Magenta – the filter cut-off sequence for this second voice.
Each of these sequencer channels has a rectangular area with 16 controls that can be changed using the mouse but let’s start by looking at the buttons beneath these.

Ignore the RECORD, COPY and PASTE buttons for now but try clicking on the others to explore the various functions.
Most of the button functions are fairly straightforward but the SMOOTH button is worth looking at more closely. Each time you press it the smoothing algorithm processes the current sequencing data, so repeated presses gradually iron out all the differences between steps. This is a very useful tool. For instance if you use the RANDOM button on a pitch sequence you often end up with something that sounds very clunky. But click on the SMOOTH button a few times and you will usually end up with something that sounds far more musical.
Once you’ve played around for a while try clicking on the COPY button on one of the sequencer channels and then the PASTE button on another. This clipboard mechanism provides an easy way to copy sequence data from one channel to another either within a module or between modules.
Then try using the <SHIFT or SHIFT> buttons on one of the copies. This can create some nice small scale canon and delay effects.
Direct editing
You’ve no doubt already tried altering the colored bars/sliders that represent the actual sequence data but here are a few tips.

Individual values can be changed with a left click or a vertical drag.
Holding down the left mouse button and moving the mouse creates a “drawing” effect that enables rapid changes to be made to any number of steps in one go.
A right click on any step except the first will copy the value from the step on the left.
Holding down the right button while sweeping right will set a whole bunch of steps to the same value.
With a little practice these gestures can be mixed together to produce a very effective editing technique.
Changing key

So far everything has been in the key of C. But there are a couple of cables patched up that enable the key selector on the Song Control module to perform key changes.
A left click on the KEY display will pop-up a menu of keys. It’s well beyond the scope of this brief tutorial to go into key modulation but some key changes sound more musical than others. Experiment with shifting between say C, E, F, G and A. Doing this via a menu is rather crude because it’s almost impossible to get the timing right but it gives you a feel for the possibilities. Of course key changes can be fully automated so that the timing can be made perfect.
One interesting thing you might have noticed if you looked closely at the block diagram above is that the key signal is sent to the Blues Scale module and also added as a transposing offset to the left channel’s pitch but not to the right channel’s pitch. This is deliberate as it shows that key changes can be obvious (when combined with transposition) but more subtle when not. So although the right hand (bass by default) voice alters some notes to keep in key it stays in more or less the same pitch range. The contrast in behaviour between the two voices adds interest to the key change.
CV Sequencer output voltage range
One little detail that needs pointing out here is that by default the CV Sequencer output ranges from 0 to 5 volts. When controlling an oscillator’s pitch this would produce a massive five octave range that wouldn’t be at all useful in this patch. So the RANGE knobs of the upper channels of both the CV Sequencers in this patch have been set at 2.0 using their right click menu Edit Value option.

So they both have a two octave rather than five octave range.
Using the Edit Value option enables precise values to be entered rather than rough ones using the knobs. Getting an exact value is sometimes required. In this case so that copying a pitch sequence from one CV Sequencer to the other results in matching pitches.